목적
윈도우 에서 Hugo로 개인블로그를 만들고 github으로 호스팅하는 법
사용 툴 버전
- 설치 날짜 : 03-31-2021
- hugo version : hugo v0.82.0
- git version : git version 2.31.1.windows.1
- windows : 10
- windows terminal: v1.7.572.0
- Chocolatey : v0.10.15
목차
github action 추가
지금 까지 스텝을 쭉 따라오셨다면 이미 웹싸이트는 완성되었다고 봐도 됩니다. 다만 글을 새로 작성할때마다 계속 업데이트를 수동으로 해줘야 한다는 단점이 존재할 뿐이죠. 자동으로 업데이트를 위해서는 github action설정이 필요합니다.
github action을 사용하려면 몇가지 설정이 필요합니다.
github secret 설정
깃헙에 프로그램이 자동으로 접속하기 위해서 github token이라는것이 필요합니다
깃헙 토큰 생성
GitHub: Where the world builds software
GitHub is where over 56 million developers shape the future of software, together. Contribute to the open source community, manage your Git repositories, review code like a pro, track bugs and feat...
github.com
위 링크를 클릭하여, repo만 허가한후 토큰을 생성합시다
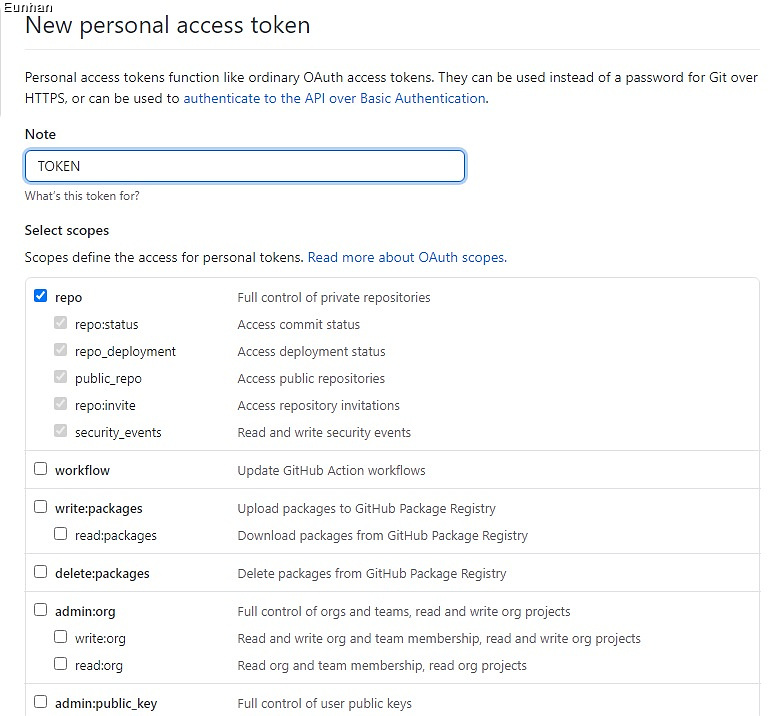
기다란 영문숫자조합이 나타날텐데, 이가 토큰입니다. 어딘가에 따로 저장을 해둡시다.
이후 myHugo 레파짓토리에 가서 setting->secrets 를 눌러서 새로운 레파딧토리 시크릿을 추가해줍시다.
name은 TOKEN으로 하고, 내용은 아까 위에서 복사해놓은 값을 넣습니다.
github action 설정
이제 myHugo레파짓토리로 가서 새로운 파일을 생성해줍시다.
.github/workflows/main.yml
그리고 main.yml의 내용은 다른분이 만들어 둔것을 사용했습니다.
source code from Arnab, Thank you Arnab!
Hugo: Deploy Static Site using GitHub Actions
If you are using Hugo to generate static pages, you are familiar with CLI commands which are to …
ruddra.com
name: CI
on: push
jobs:
  deploy:
    runs-on: ubuntu-18.04
    steps:
      - name: Git checkout
        uses: actions/checkout@v2

      - name: Update theme
        # (Optional)If you have the theme added as submodule, you can pull it and use the most updated version
        run: git submodule update --init --recursive

      - name: Setup hugo
        uses: peaceiris/actions-hugo@v2
        with:
          hugo-version: "0.64.0"

      - name: Build
        # remove --minify tag if you do not need it
        # docs: https://gohugo.io/hugo-pipes/minification/
        run: hugo --minify

      - name: Deploy
        uses: peaceiris/actions-gh-pages@v3
        with:
          personal_token: ${{ secrets.TOKEN }}
          external_repository: <username>/<username>.github.io
          publish_dir: ./public
          #   keep_files: true
          user_name: <username>
          user_email: <username@email.com>
          publish_branch: master
        #   cname: example.com
위의 내용에서
<username>부분들을 github아이디로
<username@email.com>를 깃헙 이메일로 바꿔주세요.
이제 새로운 글을 작성하여github myHugo 레파짓토리의 content에 넣으면 자동으로 html을 생성하여 사이트가 업데이트 됩니다. 이는 깃헙의 action에서 볼수 있으며, 실패역시 왜 실패 했는지 알수 있습니다.
.gitmodule 설정
만약
fatal: No url found for submodule path 'public' in .gitmodules
Error: Process completed with exit code 128.
public이라는 폴더가 어디에 연결되어 있는지 잘 모르겠다는 에러이므로
이 에러가 나타난다면, .gitmodule파일의 수정이 필요합니다.
깃헙의 myHugo 레파짓토리에 들어가보면 .gitmodule 파일이 존재 할것입니다.
공식 .gitmodule 설명
Git - gitmodules Documentation
all The submodule will never be considered modified (but will nonetheless show up in the output of status and commit when it has been staged). dirty All changes to the submodule’s work tree will be ignored, only committed differences between the HEAD of
git-scm.com
[submodule "폴더이름"]
	path = 폴더 경로
	url = 깃 주소
에를 들어, 저의 경우 blackburn테마를 사용했고, public폴더 역시 서브 모듈이므로, 아래와 같습니다.
[submodule "themes/blackburn"]
path = themes/blackburn
url = https://github.com/yoshiharuyamashita/blackburn.git
[submodule "public"]
path = public
url = git://github.com/eunhanlee/eunhanlee.github.io.git
이제 원하는 글을 써서 content에 업로드 하시면 자동으로 블로그가 업데이트 될 것입니다.
제 웹싸이트는 eunhanlee.github.io 이고, 제 github에 들어가 보시면 지금까지 한 내용 몇 파일들을 확인하실수 있습니다.
eunhanlee - Overview
eunhanlee has 5 repositories available. Follow their code on GitHub.
github.com
Eunhan's library
Problem Problem_Link 1 hour limit no search on internet Merge two sorted linked lists and return it as a sorted list. The list should be made by splicing together the nodes of the first two lists. Example 1: Input: l1 = [1,2,4], l2 = [1,3,4] Output: [1,1
eunhanlee.github.io
'old > Programming' 카테고리의 다른 글
| Hugo로 개인 블로그 만드는 법-7.마크다운 테이블 추가 (0) | 2021.04.17 |
|---|---|
| Hugo로 개인 블로그 만드는 법-6.ketax 추가 (0) | 2021.04.17 |
| Hugo로 개인 블로그 만드는 법-4.github에 업로드 (1) | 2021.04.17 |
| Hugo로 개인 블로그 만드는 법-3.블로그 생성 (0) | 2021.04.17 |
| Hugo로 개인 블로그 만드는 법-2.필요한 툴 설치 (0) | 2021.04.17 |